
In a post from last month, I admitted that I'm a projectaholic. If I'm not planning, starting, in the middle of, or finishing at least one project, something's wrong with me. Luckily, none of my projects to date have required me to spend large sums of money, and I haven't yet had to call in the professionals because I messed something up too bad to continue. But I'm digressing. Today, I am happy to announce that I have finished my latest project.
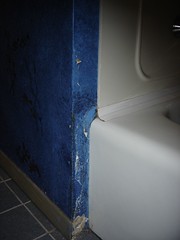
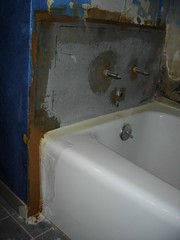
The project started out simple enough. I had a section of drywall (shown in this "before" picture) that kept rotting out due to water damage. I had already repaired it once using plaster, but alas, that too rotted out because I had not addressed the root issue. Having addressed the issue of the water leak, I felt it was time to also fix this eyesore once and for all. Simple enough, right? Wrong.
The project officially commenced with me ripping out rotten plaster. But as I got to the point where the plaster met the shower surround, I was greeted with a nasty surprise. The shower surround was no longer adhering to the drywall, which could only mean that the drywall behind the shower surround was rotted. I could have stuck with my original plan of simply repairing the small section next to the bathtub. No I couldn't. I had already patched this section twice before. I was tired or revisiting this task, I had found and fixed the source of the water leak, and determined that it was time to truly do this whole thing right, once and for all.
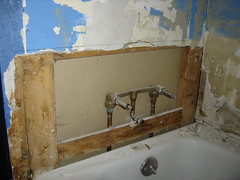
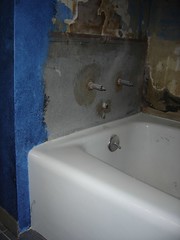
So I tore the front two sections of the shower surround off, and discovered an area of serveral square feet that had become a rotted, mold-covered mess.
I grabbed a filter mask, ripped out the mold-covered drywall and took it outside, and then scrubbed the framing lumber with bleach. The mold was dead. This picture shows how much drywall I had to cut out.
After removing all of the rotten drywall, I could almost feel the mold breeding in my lungs, despite wearing safety gear. It wasn't enough to make me sick, but I certainly could feel the effects of cleaning a mold-infested area. That was enough to make me vow that I'd never again have to deal with mold in this room. I decided to over-engineer everything that I possibly could. I began by coating everything that previously had mold on it with a layer of epoxy. That way there would be no danger of water damage, thus preventing future mold outbreaks.
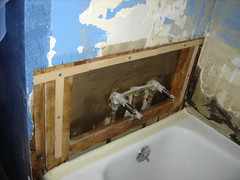
Instead of using drywall again, I replaced the rotted area with cement board. I was so determined to NOT need to re-do any of this, that I decided to over-engineer every aspect of this project that I possibly could.
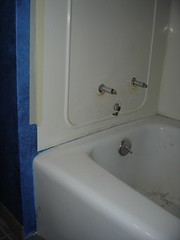
The only problem here was that the cement board is slightly thinner than drywall. I compensated by placing a shim between the frame pieces and the cement board. Paint stirring sticks were the perfect thickness, and if you look back at the previous picture, you will see them nailed to the frame.
My next over-engineered step was to fill all of the gaps with epoxy that was thickened with wood flour. Before applying the epoxy, I coated everything that may possibly need to be removed in the future (the tub and the plumbing) with plastic. That way, if I do remodel in the future, I won't have to destroy what I worked so diligently to repair. I also masked everything off, so I had perfectly straight lines.
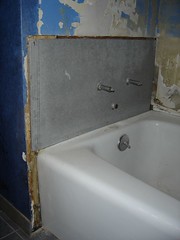
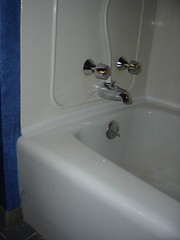
In this picture, you should note the area directly to the left of the tub. That's the area that I originally planned to fix. It's now made of epoxy. A tornado could destroy the rest of my house, and this small section would remain standing in defiance of mother nature's fury.
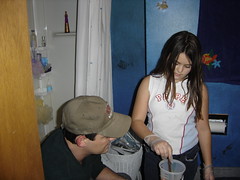
Every now and then, I got a little help. Here's a pic of my younger daughter helping dad mix epoxy.
The hard part was over. Now it was time to make it all pretty again. Slapping this coat of paint on the wall was one of the easiest parts of the project, and a firm indication that I was on the home stretch.
Another easy, but time-consuming and precise step. The base-coat is covered with a glaze to give an underwater feel to the walls. This step is time-consuming because I used two colors of glaze to get the effect I wanted, and matching it to the portions of the wall that I didn't have to repaint took a lot of patience. In the end though, I'm very happy with the result.
Re-mounting the shower surround was another time-consuming step, mainly because I needed to sand the walls and the back sides of the shower surround pieces in order to remove all of the old adhesive, paint and so forth. That sanding was done earlier in the rebuilding process.
And here's the finished result. I'm totally satisfied with the final product, but I can't help laughing at the knowledge that the only aspect of the project that people will actually see is the small section of wall next to the tub. Go ahead, see for yourself. Compare my "before" picture with this one. Virtually all of the work I did will never be seen.
Now if you'll excuse me, I need to clean the tub so my family can use it.

Subscribe to:
Post Comments (Atom)
No comments:
Post a Comment